
인스턴스를 이렇게 만들어놓은 상태라면,
키페어도 잘 가지고 있을 것이다.

나는 ubuntu로 인스턴스를 추가했기 때문에 사용자 이름은 ubuntu이다.
윈도우는 winscp, putty를 깔아 사용하거나 요즘 뜨고 있다는 방법이 있다는 데 그게 뭔지 기억이 안 난다,,
$ ssh -i /path/my-key-pair.pem my-instance-user-name@ec2-203-0-113-25.compute-1.amazonaws.com
공식 AWS에선 이렇게 하면 된다고 하는데,
ssh -i /path/my-key-pair.pem [해당하는 유저네임]@[인스턴스에서 알려준 퍼브릭 ip주소]
ssh -i [키페어경로] [위에서 본 해당 유저네임ex)ubuntu]@[인스턴스에서 알려준 퍼브릭 ip주소]
를 터미널에 치면 나온다.
1. Nginx 웹서버 설치 및 접속
터미널로 웹서버를 설치해준다.
$ sudo apt update
$ sudo apt install nginx
보안그룹에 들어간다.

인바운드 규칙 편집에 들어간다.
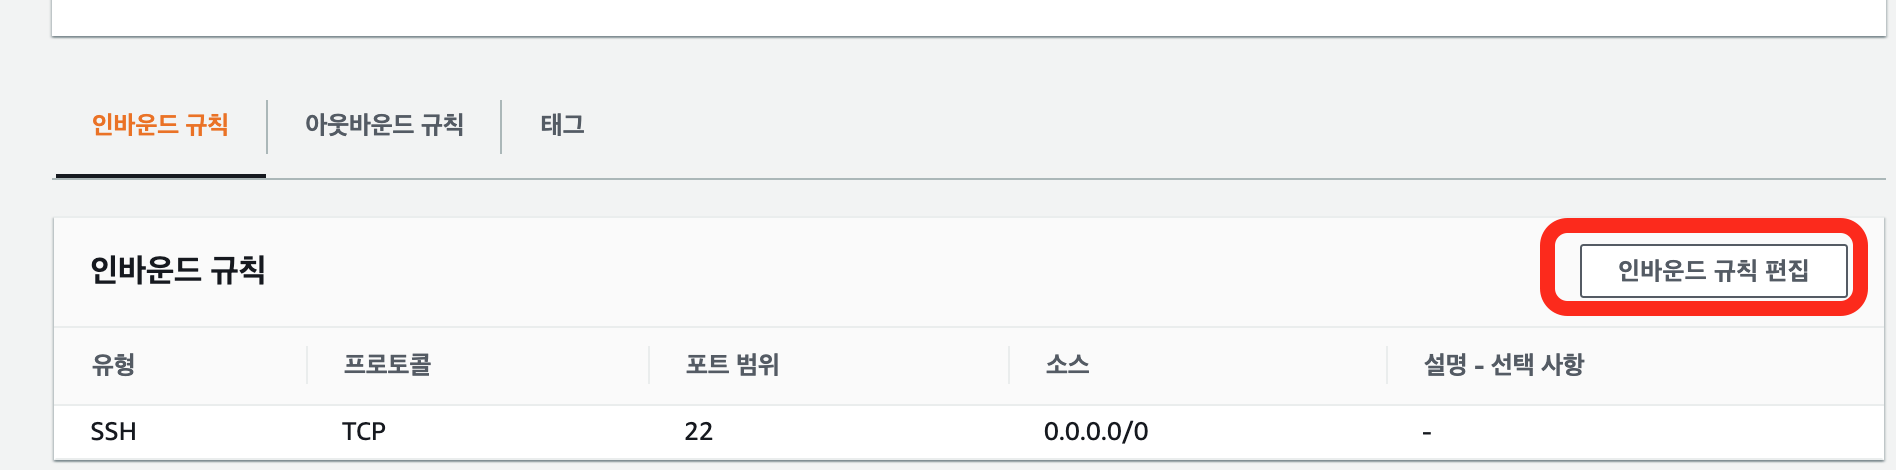
규칙추가를 눌러준다.

여기서 위치무관/내 ip만 등 중 원하는 걸로 추가해준다.
다 했으면 밑에 '규칙저장'을 누른다.

인스턴스의 ip 주소로 들어가면 nginx페이지가 잘 나타남을 알 수 있다.
2. mySQL설치
$ sudo apt install mysql-server
잘 설치됨을 알 수 있다.
- 비밀번호 설정
$ sudo mysql_secure_installation
난 거의 다 Y를 눌러줬고, strong: 다음엔 1을 눌러줬다.
Please set the password for root here.

New password:
Re-enter new password:
그 과정에서 패스워드를 입력해주고,
마찬가지로 거의 Y를 눌러주면 된다
$sudo mysql
/ sudo mysql -u root -p 도 가능
$SELECT user,authentication_string,plugin,host FROM mysql.user;

root 옆 string이 비워져있음을 알 수 있다.
> ALTER USER 'root'@'localhost' IDENTIFIED WITH mysql_native_password BY 'password';
(password엔 원하는 비밀번호)
만약,
ERROR 1819 (HY000): Your password does not satisfy the current policy requirements
에러가 난다면 아래 과정을 따라하자.
> set global validate_password_policy=LOW;
> ALTER USER 'root'@'localhost' IDENTIFIED WITH mysql_native_password BY 'password';
> FLUSH PRIVILEGES;
그럼 이제 mysql을 누르면 비밀번호를 잘 입력해야함을 알 수 있다.
3. php 설치
$ sudo apt install php-fpm php-mysql
설치해주고 확인해보도록 한다.
$ cd /var/www/html/
$ sudo vi index.php


<?php
 phpinfo();
?>
- 연동하기
아래 부분으로 들어간다.
$ sudo vi /etc/nginx/sites-available/default
아래처럼 주석처리를 없애야 한다.
server {
        listen 80;
        root /var/www/html;
        index index.php index.html index.htm index.nginx-debian.html;
        server_name example.com;

        location / {
                try_files $uri $uri/ =404;
        }

        location ~ \.php$ {
                include snippets/fastcgi-php.conf;
                fastcgi_pass unix:/var/run/php/php7.2-fpm.sock;
        }

        location ~ /\.ht {
                deny all;
        }
}
보면 알겠지만, php를 연동하기 위함이라서,
location ~ \.php${}부분만 주석처리를 취소하면 될 것이다.
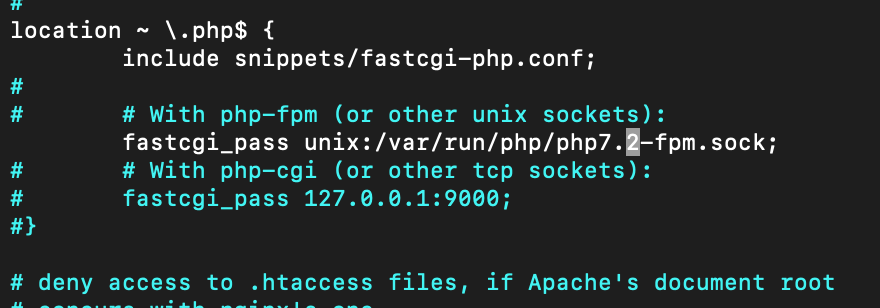
난 이 부분만 수정해주었다.
+ 밑에 '}'이거 주석처리 꼭 지워주기..
$ sudo service nginx restart

index.php도 잘 뜸을 확인할 수 있다.
How To Install Linux, Nginx, MySQL, PHP (LEMP stack) on Ubuntu 18.04 | DigitalOcean
This tutorial details the process for installing and configuring the components that constitute a LEMP stack on an Ubuntu 18.04 server, including Nginx, MySQL, and PHP. It also includes instructions for testing that these components can communicate ef
www.digitalocean.com
'백엔드' 카테고리의 다른 글
| lg u+ 공유기 포트포워딩 (2) | 2021.01.17 |
|---|---|
| [mySQL]카카오톡 DB구성 (0) | 2021.01.12 |
| [ubuntu]apache컴파일설치/소스설치하기/수동설치 (0) | 2021.01.08 |
| [ubuntu]mysql소스설치하기/컴파일설치/수동설치 (1) | 2021.01.07 |
| [mac]virtualbox로 ubuntu 20.04설치 (0) | 2021.01.04 |


